08 December, 2013

Useful FFMpeg Filter


FFMpeg offers more than standard encoding/decoding.  It also allows for running a series of filters, both audio and video, that may prove useful in many a situation.

Let's start with an good quality input video;


$ ffmpeg -y -i video.avi -ss 10 -t 40 -qscale 0 -s 360x240 clip01.mpg


Ok, now that we have a video let's look at a few things we may choose to do with it using our newly discovered filters.

Adjusting Video Speed

Suppose you wish to speed the video up, perhaps to expedite review of a surveillance video or perhaps minimizing the exposure to the latest Sandra Bullock film.

We can double the playback speed by specifying a 0.5 playback coefficient;

$ ffmpeg -y -i clip01.mpg -filter:v "setpts=0.5*PTS" clip02.mpg


You'll notice however from the previous video that while the video element is playing at double speed, the audio hasn't changed.  We can speed up the audio similarly by adding an appropriate audio filter.


$ ffmpeg -y -i clip01.mpg -filter:v "setpts=0.5*PTS" -filter:a "atempo=2.0" clip03.mpg


Attempting to speed up faster than 2x will present a hurdle with speeding up the audio filter, which specifies a coefficient range of [0.5, 2.0].  You can get around that by chaining filters;

$ ffmpeg -i clip01.mpg -filter:v "setpts=0.25*PTS" -filter:a "atempo=2.0,atempo=2.0" clip04.mpg


Cropping Video

Suppose we wish to crop the inner middle of the video.  Given the video is 360x240, we need to grab 180x120 inset by 90,60.

$ ffmpeg -y -i clip01.mpg -filter:v "crop=180:120:90:60" clip05.mpg


Processing Edge Detection

Perhaps less useful, but certainly interesting, you can perform edge detection via a Canny Edge Detection algorithm;
$ ffmpeg -y -i clip01.mpg -filter:v "edgedetect=low=0.1:high=0.4" clip06.mpg


Flipping the Video

You can flip the video left-right or top-down;
$ ffmpeg -y -i clip01.mpg -filter:v "hflip" clip07.mpg


$ ffmpeg -y -i clip01.mpg -filter:v "vflip" clip08.mpg


Creating Video Using Source Filter

Occasionally, you want to generate a video using a test source; in other words, without an input video to start with.
$ ffmpeg -f lavfi -i rgbtestsrc -t 30 -pix_fmt yuv420p clip09.mpg


$ ffmpeg -f lavfi -i testsrc=duration=20:size=1280x720:rate=30 -vcodec mpeg2video clip10.mpg

29 November, 2013

Extracting Video from DVDs

Time and again I find a need to snag video from a DVD and perform some routine video processing.

FFMpeg works nicely with standard video files, less nicely with DVD structures.  While you can certainly extract video directly from the DVD VOB files (ref: http://en.wikibooks.org/wiki/Inside_DVD-Video/Directory_Structure) it's less than desirable since the locating the specific VOB file that contains the segment of video your interested in can be a bit of a setback.

Enter Mplayer;
Mplayer can readily play DVD contents in a user friendly way.  It can also dump the file to a more usable file if you can persuade it to do so.

You can extract the full main title into a single VOB file can be done by playing the DVD somewhat normally, but adding a few arguments;


$ mplayer dvd:// -dumpstream -dumpfile /tmp/video.vob


user@River:~$ 
The above will extract the main title into a single VOB file.  Examining with FFMpeg and you'll find that the output file has a video stream and a single audio stream;


$ ffprobe -i /tmp/video.vob

ffprobe version 1.1.2 Copyright (c) 2007-2013 the FFmpeg developers

  built on Feb 10 2013 17:42:38 with gcc 4.4.5 (Debian 4.4.5-8)

  configuration: --enable-filter=split

  libavutil      52. 13.100 / 52. 13.100

  libavcodec     54. 86.100 / 54. 86.100

  libavformat    54. 59.106 / 54. 59.106

  libavdevice    54.  3.102 / 54.  3.102

  libavfilter     3. 32.100 /  3. 32.100

  libswscale      2.  1.103 /  2.  1.103

  libswresample   0. 17.102 /  0. 17.102

[mpeg @ 0x2cd4c60] max_analyze_duration 5000000 reached at 5004678

Input #0, mpeg, from '/tmp/video.vob':

  Duration: 01:37:58.02, start: 0.280633, bitrate: 5012 kb/s

    Stream #0:0[0x1e0]: Video: mpeg2video (Main), yuv420p, 720x480 [SAR 32:27 DAR 16:9], 26.50 fps, 59.94 tbr, 90k tbn, 59.94 tbc

    Stream #0:1[0x80]: Audio: ac3, 48000 Hz, 5.1(side), fltp, 448 kb/s


You may choose an alternative container rather than a VOB by specifying an alternative extension, such as an AVI container by specifying output file video.avi.

Now, we have something we can readily work with.

Let's snag a 30 sec clip starting at 90 seconds in:


$ ffmpeg -i /tmp/video.vob -qscale 0 -ss 90 -t 30 /tmp/clip.mpg


If you're only interested in the video, you can extract only the video by specifying;


$ mplayer dvd:// -dumpvideo -dumpfile /tmp/video01.avi


Or, if you're only interested in listening to the Big Bang Theory like an audio tape, extract only the audio;


$ mplayer dvd:// -dumpaudio -dumpfile /tmp/video01.aac


Cheers.

24 October, 2013

Create Counting Video


On a couple of occasions, I've had the need to create a source video for video processing and testing video processing commands.  A common need is to create a counting video by generating a series of frames and stitching them together at a pre-defined frame rate.

Below is a mechanism for doing so;


$ cat createVideo 
#!/bin/bash

ws=/var/tmp/cache
rm -rf $ws
mkdir -p $ws

for i in `seq 300`; do
  N=$(printf %03d $i)
  convert -size 640x480 -background white -fill black -pointsize 120 -gravity center label:$i $ws/frame-$N.jpg
done

ffmpeg -y -r 2/1 -i $ws/frame-%03d.jpg -r 30/1 $ws/video.avi
mplayer $ws/video.avi


Cheers.

18 October, 2013

Formatting Numerics With Bash

A repeated need I've encountered is a need to format a numeric with leading zeros, similar to the common form used in C.  Typically, I take a over-complicated approach of comparing the number to >100 or >10 and pre-pending leading zeros.

After investigating alternative approaches with good 'ole Google, the better approach is shown below;


$ cat /tmp/go 
#!/bin/bash

for i in `seq 100`; do
  N=$(printf %03d $i)
  echo $N
done

Cheers.

11 October, 2013

FFMpeg Cropping Videos

Recently had a need to crop videos using FFMpeg, thought it worth sharing. Starting with the initial video:

$ ffmpeg -i ExSlyoVTX3I.flv -vf crop=160:120:10:10 -sameq /tmp/out.mp4

The result is a cropped video 160x120 with an offset of 10,10 from the upper left-hand corner.


Cheers.

05 October, 2013

Google ProtoBuff + ZeroMq -- Python

In our last post, we combined ZeroMq & Google Protobuf, a combination that enables heterogeneous distributed computing systems.  The last post integrated the two using C++, this post will focus on integrating the two using Python.  In the end, we'll have an example that can communicate with the previous C++ example seamlessly.

Below is a Makefile, used to create and clean up Google Protobuf message files.


$ cat Makefile

msgs:

 ${SH} protoc -I=. --python_out=. Messages.proto


clean:

 ${RM} Messages_pb2.py


Our sender script is below, notice the change is that of the content exchanged, specifically the serialized protobuff message.


$ cat sender
#!/usr/bin/python
import zmq;
import time;
import Messages_pb2
context = zmq.Context();
pub=context.socket(zmq.PUB);
pub.bind("tcp://127.0.0.1:8000");
for i in range(0,10):
  p=Messages_pb2.Person();
  p.id=i;
  p.name="fatslowkid";
  print "iteration",i
  pub.send(p.SerializeToString());
  time.sleep(1);

The receiver;

$ cat receiver
#!/usr/bin/python
import zmq;
import time;
import Messages_pb2
context = zmq.Context();
sub=context.socket(zmq.SUB);
sub.connect("tcp://127.0.0.1:8000");
filter=""
sub.setsockopt(zmq.SUBSCRIBE, filter);
for i in range(0,20):
  print "waiting on msg"
  M=sub.recv();
  p=Messages_pb2.Person();
  p.ParseFromString(M);
  print "received",p
  print "> " + p.name;
  print p.id;

The sender/receiver can be used together, or used with the previous C++ example.

Cheers.

28 September, 2013

Google ProtoBuff + ZeroMq -- C++

In the last series of posts we demonstrated ZeroMq as a technology that supports 'sockets on steroids', supporting multiple platforms as well as multiple languages.  The examples to-date have been transmitting strings between senders and receivers.  While interesting, to effectively create a distributed heterogeneous system we need to be capable of transmitting meaningful messages, preferably complex data structures rather than just strings.  That's where Google's Protobuff comes into play: http://code.google.com/p/protobuf/

Building off our previously created Ubuntu 12.04 32-bit VM, let's start by installing the additional necessary packages;


$ sudo apt-get install libprotoc-dev

With the developer libraries installed, we can now extend our previous C++ example to transmit a ProtoBuff message.

We'll extend our Makefile to add the necessary libraries and a target (e.g. msgs) to generate the C++ files for the message.


$ cat Makefile 
CC=g++
SRCS=main.cpp Messages.pb.cc
OBJS=$(subst .cpp,.o,$(SRCS))
INCLUDES += -I.
LIBS += -lpthread -lrt -lzmq -lprotobuf
.cpp.o:
$(CC) -c $<
main: msgs ${OBJS} 
${CC} ${CFLAGS} -o $@ ${OBJS} ${LIBS}
msgs:
${SH} protoc -I. --cpp_out=. Messages.proto
clean:
${RM} ${OBJS} main *.pb.*

Oh, we should take a look at our simple Protobuff message file:

$ cat Messages.proto 
message Person {
  required int32 id=1;
  required string name=2;
}

Finally, our extended main file:

$ cat main.cpp 
#include
#include
#include
#include
#include
#include
#include "Messages.pb.h"
void* ctx=zmq_init(1);
char* EndPoint="tcp://127.0.0.1:8000";
static const int N=100;
static const int BufferSize=128;
void* sender(void*)
{
  printf("(%s:%d) running\n",__FILE__,__LINE__);
  void* pub=zmq_socket(ctx, ZMQ_PUB);
  assert(pub);
  int rc=zmq_bind(pub,EndPoint);
  assert(rc==0);
  Person p;
  p.set_name("fatslowkid");
  p.set_id(01);
  for(int i=0; i
  {
    zmq_msg_t msg;
    std::string S=p.SerializeAsString();
    char* content=(char*)S.c_str();
    int rc=zmq_msg_init_size(&msg, BufferSize);
    assert(rc==0);
    rc=zmq_msg_init_data(&msg, content, strlen(content), 0,0);
    assert(rc==0);
    rc=zmq_send(pub, &msg, 0);
    assert(rc==0);
    ::usleep(100000);
  }
}
void* receiver(void*)
{
  printf("(%s:%d) running\n",__FILE__,__LINE__);
  void* sub=zmq_socket(ctx, ZMQ_SUB);
  assert(sub);
  int rc=zmq_connect(sub,EndPoint);
  assert(rc==0);
  char* filter="";
  rc=zmq_setsockopt(sub, ZMQ_SUBSCRIBE, filter, strlen(filter));
  assert(rc==0);
  for(int i=0; i
  {
    zmq_msg_t msg;
    zmq_msg_init_size(&msg, BufferSize);
    const int rc=zmq_recv (sub, &msg, 0);
    char* content=(char*)zmq_msg_data(&msg);
    Person p;
    p.ParseFromString(content);
    printf("(%s:%d) received: '%s'\n",__FILE__,__LINE__,p.name().c_str());
    zmq_msg_close(&msg);
  }
}
int main(int argc, char* argv[])
{
  printf("(%s:%d) main process initializing\n",__FILE__,__LINE__);
  int major, minor, patch;
  zmq_version (&major, &minor, &patch);
  printf("(%s:%d) zmq version: %d.%d.%d\n",__FILE__,__LINE__,major,minor,patch);
  pthread_t rId;
  pthread_create(&rId, 0, receiver, 0);
  pthread_t sId;
  pthread_create(&sId, 0, sender, 0);
  pthread_join(rId,0);
  pthread_join(sId,0);
  printf("(%s:%d) main process terminating\n",__FILE__,__LINE__);
}

Notice that we now transmit and receive Protobuf messages, serialized as strings.  The value of this is that the serialization mechanism is multi-platform & multi-language support.

Cheers.

21 September, 2013

ZeroMq Installation -- Python

In a previous post I documented the procedure for installing ZeroMq libraries for C/C++ applications. This post will focus on installing ZeroMq for Python development.


Let's get started;

Our target installation machine is Ubuntu 12.04 64-bit Desktop edition; http://www.ubuntu.com/download/desktop.  Your mileage may vary with alternative distributions.  I'm starting with a new default installation and will work through the installation process from here on.


$ sudo apt-get install python-zmq


After the APT package handling utility is done humping package installations you should have a function, albeit dated, version to begin working with.

Let's take a look at what version we're dealing with here.


$ cat go
#!/usr/bin/python
import zmq;
print zmq.pyzmq_version()
Running this beauty will show us the version of Zmq we've got installed.

$ ./go
2.1.11
Let's continue our sandbox by creating a sender and receiver Python script as follows;

$ more sender receiver
::::::::::::::
sender
::::::::::::::
#!/usr/bin/python

import zmq;
import time;

context = zmq.Context();
pub=context.socket(zmq.PUB);
pub.bind("tcp://127.0.0.1:8000");

for i in range(0,20):
  print "iteration",i
  pub.send("some message");
  time.sleep(1);
::::::::::::::
receiver
::::::::::::::
#!/usr/bin/python

import zmq;
import time;

context = zmq.Context();
sub=context.socket(zmq.SUB);
sub.connect("tcp://127.0.0.1:8000");
filter=""
sub.setsockopt(zmq.SUBSCRIBE, filter);


for i in range(0,20):
  print "waiting on msg"
  M=sub.recv();
  print "received",M

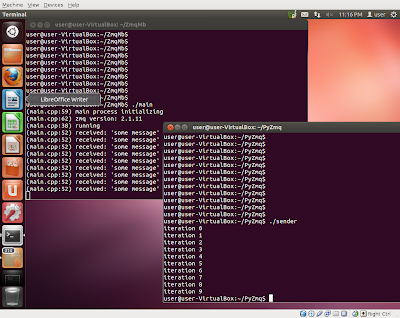
Running these two concurrently demonstrates the message delivery from the sender to the receiver;

::::::::::::::
sender.log
::::::::::::::
iteration 0
iteration 1
iteration 2
iteration 3
iteration 4
iteration 5
iteration 6
iteration 7
iteration 8
iteration 9
iteration 10
iteration 11
iteration 12
iteration 13
iteration 14
iteration 15
iteration 16
iteration 17
iteration 18
iteration 19
::::::::::::::
receiver.log
::::::::::::::
waiting on msg
received some message
waiting on msg
received some message
waiting on msg
received some message
waiting on msg
received some message
waiting on msg
received some message
waiting on msg
received some message
waiting on msg
received some message
waiting on msg
received some message
waiting on msg
received some message
waiting on msg
received some message
waiting on msg
received some message
waiting on msg
received some message
waiting on msg
received some message
waiting on msg
received some message
waiting on msg
received some message
waiting on msg
received some message
waiting on msg
received some message
waiting on msg
received some message
waiting on msg
received some message
waiting on msg

What may be of interest you as well is that since the 'endpoint' is defined identically to the one used in the C++ example you can send messages from the Python sender script to the C++ main application.

Enjoy.

14 September, 2013

ZeroMq Installation -- C++

ZeroMq, or 0Mq if you prefer, is considered 'sockets on steroids'.  The framework is aimed at simplifying distributed communications, serves as a concurrency framework, and supports more languages than any normal mortal would ever require.
http://zeromq.org

The topic of this post will be guiding through the installation on Ubuntu 12.04 and writing enough example code to verify all is happy.  Future posts will focus on installation of alternative, and interesting, languages with the overall intent of demonstrating interoperability between the languages.

Let's get started;

Our target installation machine is Ubuntu 12.04 64-bit Desktop edition; http://www.ubuntu.com/download/desktop.  Your mileage may vary with alternative distributions.  I'm starting with a new default installation and will work through the installation process from here on.


$ sudo apt-get install libzmq-dev


After the APT package handling utility is done humping package installations you should have a function, albeit dated, version to begin working with.

While ZeroMq supports a plethora of languages, the focus of this post is on C++.  That said, we'll need to install GCC C++ compiler.


$ sudo apt-get install g++


As I said earlier, the Ubuntu repository has a fairly old version.  At time of this writing, v3.2.3 was the latest stable release but for the purposes of this post we'll continue to use this version.

Let's confirm what version we have by authoring our first C++ application and ensure we can successfully compile/link with the installed libraries.

Start with a simple Makefile;


$ cat Makefile


CC=g++


SRCS=main.cpp

OBJS=$(subst .cpp,.o,$(SRCS))

INCLUDES += -I.

LIBS += -lpthread -lrt -lzmq


.cpp.o:

 $(CC) -c $<


main: ${OBJS}

 ${CC} ${CFLAGS} -o $@ ${OBJS} ${LIBS}


clean:

 ${RM} ${OBJS} main


And now let's look as a trival main program that confirms we can compile/link with Zmq libraries;


$ cat main.cpp


#include 

#include 


int main(int argc, char* argv[])

{

  printf("(%s:%d) main process initializing\n",__FILE__,__LINE__);

  int major, minor, patch;

  zmq_version (&major, &minor, &patch);

  printf("(%s:%d) zmq version: %d.%d.%d\n",__FILE__,__LINE__,major,minor,patch);

  printf("(%s:%d) main process terminating\n",__FILE__,__LINE__);

}


Running it confirms the installed Zmq libraries are near ancient, but again ok for our short-term purposes.


$ ./main


(main.cpp:6) main process initializing

(main.cpp:6) zmq version: 2.1.11
(main.cpp:6) main process terminating

Let's extend this to make it a bit more interesting, classic sender/receiver communication model using the PUB/SUB comm model provided by ZeroMq.


$ cat main.cpp


#include 

#include 

#include 

#include 

#include 

#include 


void* ctx=zmq_init(1);

char* EndPoint="tcp://127.0.0.1:8000";

static const int N=100;

static const int BufferSize=128;


void* sender(void*)

{

  printf("(%s:%d) running\n",__FILE__,__LINE__);

  void* pub=zmq_socket(ctx, ZMQ_PUB);

  assert(pub);

  int rc=zmq_bind(pub,EndPoint);

  assert(rc==0);

  for(int i=0; i  {

    char content[BufferSize];

    sprintf(content, "message %03d",i);

    zmq_msg_t msg;

    int rc=zmq_msg_init_size(&msg, BufferSize);

    assert(rc==0);

    rc=zmq_msg_init_data(&msg, content, strlen(content), 0,0);

    assert(rc==0);

    printf("(%s:%d) sending '%s'\n",__FILE__,__LINE__,content);

    rc=zmq_send(pub, &msg, 0);

    assert(rc==0);

    ::usleep(100000);

  }

}


void* receiver(void*)

{

  printf("(%s:%d) running\n",__FILE__,__LINE__);

  void* sub=zmq_socket(ctx, ZMQ_SUB);

  assert(sub);

  int rc=zmq_connect(sub,EndPoint);

  assert(rc==0);

  char* filter="";

  rc=zmq_setsockopt(sub, ZMQ_SUBSCRIBE, filter, strlen(filter));

  assert(rc==0);

  for(int i=0; i  {

    zmq_msg_t msg;

    zmq_msg_init_size(&msg, BufferSize);

    const int rc=zmq_recv (sub, &msg, 0);

    char* content=(char*)zmq_msg_data(&msg);

    printf("(%s:%d) received: '%s'\n",__FILE__,__LINE__,content);

    zmq_msg_close(&msg);

  }

}


int main(int argc, char* argv[])

{

  printf("(%s:%d) main process initializing\n",__FILE__,__LINE__);

  int major, minor, patch;

  zmq_version (&major, &minor, &patch);

  printf("(%s:%d) zmq version: %d.%d.%d\n",__FILE__,__LINE__,major,minor,patch);


  pthread_t rId;

  pthread_create(&rId, 0, receiver, 0);


  pthread_t sId;

  pthread_create(&sId, 0, sender, 0);


  pthread_join(rId,0);

  pthread_join(sId,0);


  printf("(%s:%d) main process terminating\n",__FILE__,__LINE__);

}


Running this beauty will result in the following;

$ cat /var/tmp/ZmqMb/main.log 
(main.cpp:59) main process initializing
(main.cpp:62) zmq version: 2.1.11
(main.cpp:15) running
(main.cpp:29) sending 'message 000'
(main.cpp:38) running
(main.cpp:29) sending 'message 001'
(main.cpp:52) received: 'message 001'
(main.cpp:29) sending 'message 002'
(main.cpp:52) received: 'message 002'
(main.cpp:29) sending 'message 003'
(main.cpp:52) received: 'message 003'
(main.cpp:29) sending 'message 004'
(main.cpp:52) received: 'message 004'
(main.cpp:29) sending 'message 005'
(main.cpp:52) received: 'message 005'
(main.cpp:29) sending 'message 006'
(main.cpp:52) received: 'message 006'
(main.cpp:29) sending 'message 007'
(main.cpp:52) received: 'message 007'
(main.cpp:29) sending 'message 008'
(main.cpp:52) received: 'message 008'
(main.cpp:29) sending 'message 009'
(main.cpp:52) received: 'message 009'
(main.cpp:29) sending 'message 010'
(main.cpp:52) received: 'message 010'
(main.cpp:29) sending 'message 011'
(main.cpp:52) received: 'message 011'


You'll notice that the first message was lost.  I've never had a sufficient understanding of why this happens, but typically the first message can be lost, primarily due to the pub/sub sockets not necessarily being fully established.  Issuing a 'sleep' between socket creation and between the receiver and sender socket usage doesn't solve the problem, it's more involved than that and I have little to offer as an explanation.

So, there you go; a simple usage of ZeroMq.

Cheers.


07 September, 2013

Youtube Downloader from the Linux Command Line

God Bless YouTube!

Where else can you find entertainment, education and countless kitty/puppy videos?

But what if you wish to preserve the video, downloading for archive purposes or access it from Internet-incapable devices?

Start by installing youtube-dl:

# apt-get install youtube-dl


Next, navigate to your desired video and copy the URL; e.g.

http://www.youtube.com/watch?v=Wtfo43yV8rA

Lastly, execute youtube-dl with specified URL:


$ youtube-dl http://www.youtube.com/watch?v=Wtfo43yV8rA


The result will be a Macromedia Flash Video file.  Convert to your preferred file format using Ffmeg and Bob's Your Uncle.

31 August, 2013

Android Rtsp Usage


Loved my Samsung Galaxy but recently replaced it.  Result is that I have a relatively decent smart phone with little, to no, purpose in life.  Repurposing as a RTSP server device seemed like a reasonable task.

Reviewed a series of video server apps in the Google Play Store, but only one that worked well for me with Linux RTSP clients was:
https://play.google.com/store/apps/details?id=com.pas.webcam

After installing the app and short configuration, you start the server by clicking the 'Start server' button in the video preference activity.

Once the phone streaming is running, it displays a live view of the scene and the connection URL.

Open it with VLC and you're cookin' with bacon:


$ cvlc http://192.168.0.157:8080/video


VoilĂ .

24 August, 2013

Soupin' Up Your Linux Harddrive Performance

I came across a little utility that I was until now unaware of. I discovered it when I was doing a search for increasing hard drive performance on our Linux workstations, the utility 'hdparm'.

The remainder of this posting should be performed in single-user mode to avoid interrupting remote users and get proper performance measurements for your system.

First, let's baseline our system hard drive performance, do so performing the following command as root.

# /sbin/hdparm -Tt /dev/hda

The first parameter '-T' measures the performance of the cache system, how the memory, CPU and buffer cache perform together.

The second parameter '-t' measures the performance of the disk, reading data not in cache. According to my drives specs which advertises XXX MB/sec this is pathetic in comparison.

# /sbin/hdparm /dev/hda

It shouldn't surprise you to see a good number of the drive features are turned off. These default settings are nice, safe but by no means optimal. These settings are pretty much guaranteed to work for near any system you throw at it, from a x386 to bleeding edge hardware.

The first option, 'multicount' is short for multiple sector count. This controls how many sectors are fetched from the disk for a single I/O interrupt. The man page suggests that enabling this feature may reduce disk overhead by 30-50% and provide 5-50% data throughput improvements.
The second option, 'I/O support' controls how data passes from the PCI bus to the controller. Near all modern controller chipsets support mode 3, 32-bit mode w/sync. Turning this on will likely near double your throughput.
The third option, 'unmaskirq' allows Linut to unmask other interrups, allowint it to attend to other interrupt driven tasks whil waiting for the disk to return the requested data. While not all hardware configurations will be able to handle this, if your hardware supports it you should note better response time.
The fourth option, 'use_dma' should be used with a bit more caution, we'll be ignoring this feature as it's documented as risky.

So, let's get our hands dirty.
Let's first set 32-bit w/sync on and multicount on.


# /sbin/hdparm -c3 -m16 /dev/hda
# /sbin/hdparm -Tt /dev/hda


'K, let's take another step.

# /sbin/hdparm -X66 -d1 -u1 -m16 -c3 /dev/hda
# /sbin/hdparm -Tt /dev/hda


It's worth noting that these settings don't persist, rebooting your box will default back to your original settings. This allows you to play around with it 'til you find a suite of settings you're happy with. When you're happy, edit your /etc/rc.d/* scripts, adding the assignments after the fsck check.


17 August, 2013

Simple Bash Loop

Seems I have to look this up a gazillion times.


#!/bin/bash

for i in {1..5}; do
 echo $i
done

Cheers.

28 March, 2013

Side-by-Side RTSP Stream Capture

Assuming you have two RTSP MPEG-4 streams and wish to generate a side-by-side mosaic. You can do this by using the video filter overlay method; ffmpeg -y -q:v 0 -i rtsp://192.168.128.85/video -q:v 0 -an -vf "[in] pad=2*iw:ih [left]; movie='rtsp\://192.168.128.86/video' [right]; [left][right] overlay=main_w/2:0 [out]" /tmp/sidebyside.avi

Generate Side-by-Side Video Using FFMpeg


Seems I've been doing things the hard way for quite some time.  Occasionally, I've found it useful to generate mosaic'ish videos.  'til now, I've done so by extracting frames from the video into a series of png or jpg files, using ImageMagick to generate the source images, then reassemble the input frames into a video.  Seems an easier way is to extend one of the source video files into the destination dimensions, then overlay the other video over the extended space.

$ ffmpeg -y -i ./Downloads/big_buck_bunny_1080p_surround.avi -s 640x480 -an -sameq /var/tmp/left.avi
$ ffmpeg -y -i /var/tmp/left.avi -vf "pad=1280:480:0:0:black" -sameq /var/tmp/wide.avi
$ ffmpeg -y -i /var/tmp/wide.avi -vf "movie=/var/tmp/left.avi[mv]; [in][mv] overlay=640:0" -sameq /var/tmp/side.avi


Cheers.

16 March, 2013

FFMpeg Piping to Mplayer

Far too often I find myself playing with ffmpeg, trying to transcode a video and evaluating the results. The typical manner of doing this is taking the input file, generating an output file, then playing with the equivalent of mplayer. The need for the temporary output file is primarily motivated because I wasn't aware how to properly pipe the transcoded video to standard output and pipe it to the display utility (e.g. mplayer). I did however recently figure this out, and decided to post for those of you struggling with the same issue. The following example takes in the popular open-source video, transcoding to mpeg format and uses only the first audio chanel, using same video quality but resizes to 720x480 and pipes the output to mplayer.

ffmpeg -i Videos/big_buck_bunny_1080p_surround.avi -f mpeg -ac 1 -sameq -s 720x480 - | mplayer -
Enjoy.